Convert a 2D Floor Plan into a 3D Render with AI
Upload a floor plan image to ArkViz AI and get a photorealistic top-down 3D render of the layout in 15–45 seconds — walls, rooms, furniture and finishes, ready to show a client. No 3D modelling, no plugin, no prompts.
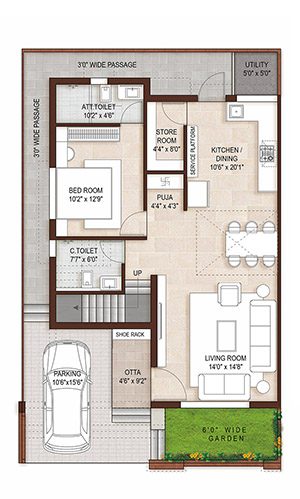
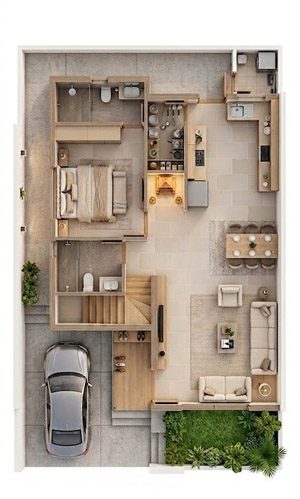
Drag the handle to compare the 2D floor plan with the ArkViz AI top-down 3D render.
Quick answer: To convert a 2D floor plan into a 3D render with ArkViz AI, save your floor plan as a JPG or PNG (a CAD export, PDF screenshot or clean scan), open app.arkviz.ai, choose Floor Plan mode, upload the image, pick a style, and click Generate. In about 15–45 seconds you get a photorealistic top-down 3D render that follows your plan's walls and room layout.
Help clients understand a layout at a glance
Most clients find 2D floor plans hard to read. Lines, symbols and dimensions make sense to architects, but a buyer or homeowner often can't picture how the rooms will actually feel. A top-down 3D render shows the same layout with real floors, furniture and finishes, so the plan becomes instantly understandable.
Building that view the traditional way means modelling walls, placing furniture, assigning materials and rendering. ArkViz AI does it directly from the plan image.
No 3D modelling
Start from the 2D plan you already have. There's no need to build a model first.
Layout kept
The render follows your plan's walls, rooms and openings, so the design stays as drawn.
Ready in seconds
Most renders finish in 15–45 seconds, fast enough to try several styles in one sitting.
How to turn a floor plan into a 3D render with ArkViz AI
Prepare your floor plan image
Export the plan from your CAD software as a JPG or PNG, take a screenshot of a PDF, or scan a printed plan. Crop it so only the plan is visible.
Open ArkViz AI and choose Floor Plan mode
Go to app.arkviz.ai and select the Floor Plan render mode.
Upload and pick a style
Upload your plan (JPG or PNG, up to 50 MB) and choose an interior style such as Modern, Luxury, Scandinavian or Industrial.
Generate and download
Click Generate. In 15–45 seconds you get a photorealistic top-down 3D render. Download it for your presentation, or upscale it for print (up to 8K, depending on plan).
Tips for preparing a floor plan for AI rendering
The AI reads the lines in your image, so a clean, clear plan gives the most accurate result.
- Crop to the plan only. Remove title blocks, legends, notes and borders around the drawing.
- One floor per image. If your drawing sheet shows several levels, upload each floor separately.
- Use clear, dark lines on a light background. Walls should be easy to tell apart from furniture and dimension lines.
- Upload a sharp, high-resolution image. Blurry phone photos or low-resolution scans make walls and doors harder to read.
- Keep it straight. Rotate scans so walls are horizontal and vertical, not tilted.
- Reduce clutter. Hiding heavy hatching, grid lines and dense dimension chains helps the AI focus on walls and rooms.
What ArkViz AI does — and doesn't — do with floor plans
It creates a top-down 3D render. The output is a photorealistic image of your layout seen from above, with floors, walls, furniture and finishes.
It works from images, not CAD files. Upload a JPG or PNG of the plan. ArkViz AI doesn't open DWG, DXF or PDF files directly, so export or screenshot the plan first.
It's a presentation visual, not a construction drawing. Use it to communicate the design to clients, buyers or your team. Your original drawings remain the reference for dimensions and construction.
Working from a 3D model or sketch instead? See the SketchUp to render guide.